Setting up a Backpack Electrofisher to Capture Larval Lamprey
Detecting larval lamprey can be difficult. Smith-Root’s backpack electrofishers are scientifically proven to increase your odds of capturing larval lamprey when using specialized lamprey settings (Dunham et al. 2013).
Juvenile lamprey live in fine sediment. Under typical electrofishing settings, larval lamprey can become immobilized within the sediment, therefore reducing detection capabilities (Thompson et al. 2010).
Specialized lamprey settings provide two channels of electrofishing settings to increase detection and capture capabilities. The primary channel is unique and promotes lamprey movement out of the sediment. A secondary channel, activated by the user by releasing and quickly pressing the anode pole switch, is similar to typical electrofishing settings and aids in capture once the lamprey is out of the sediment.
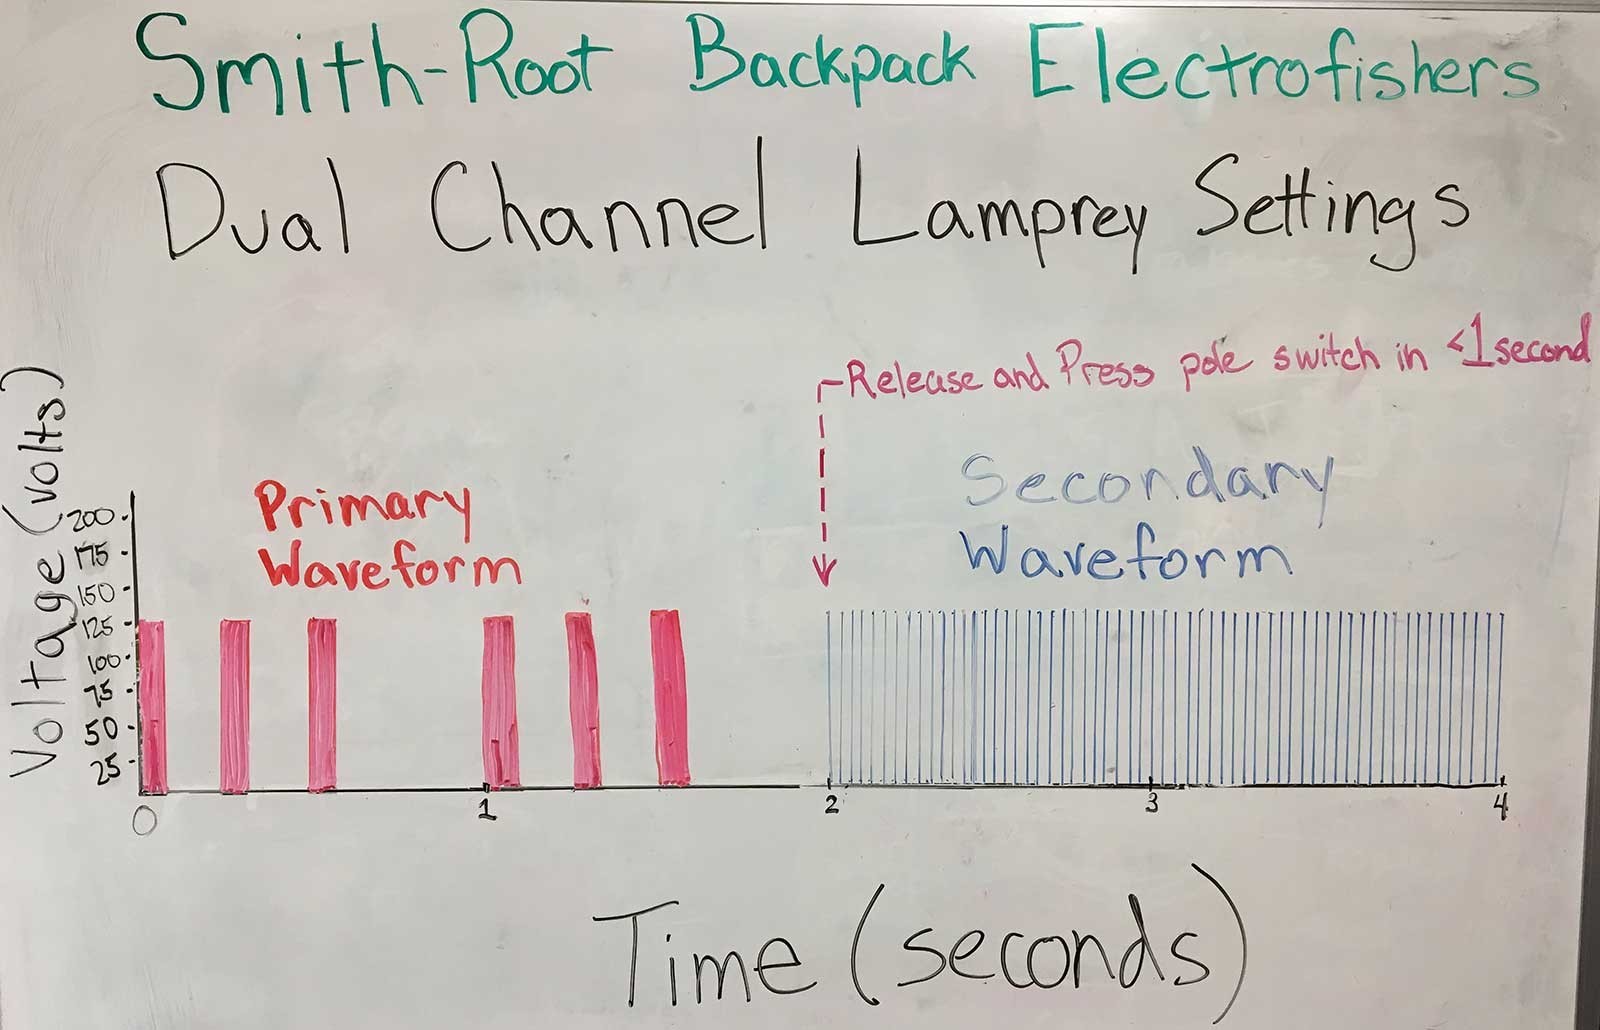
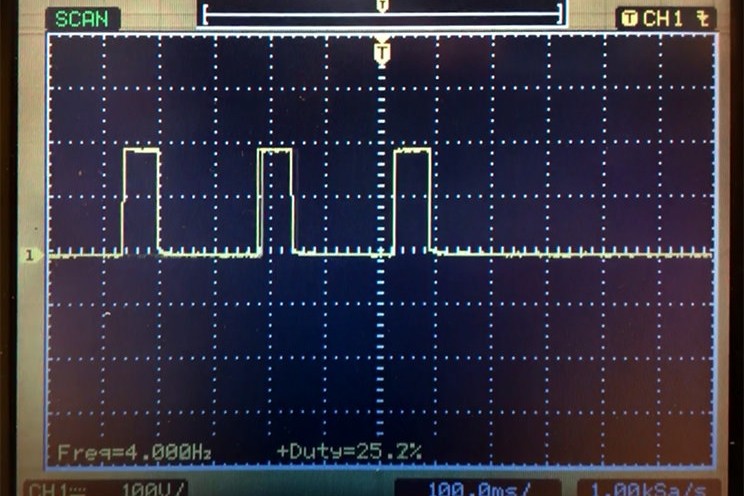
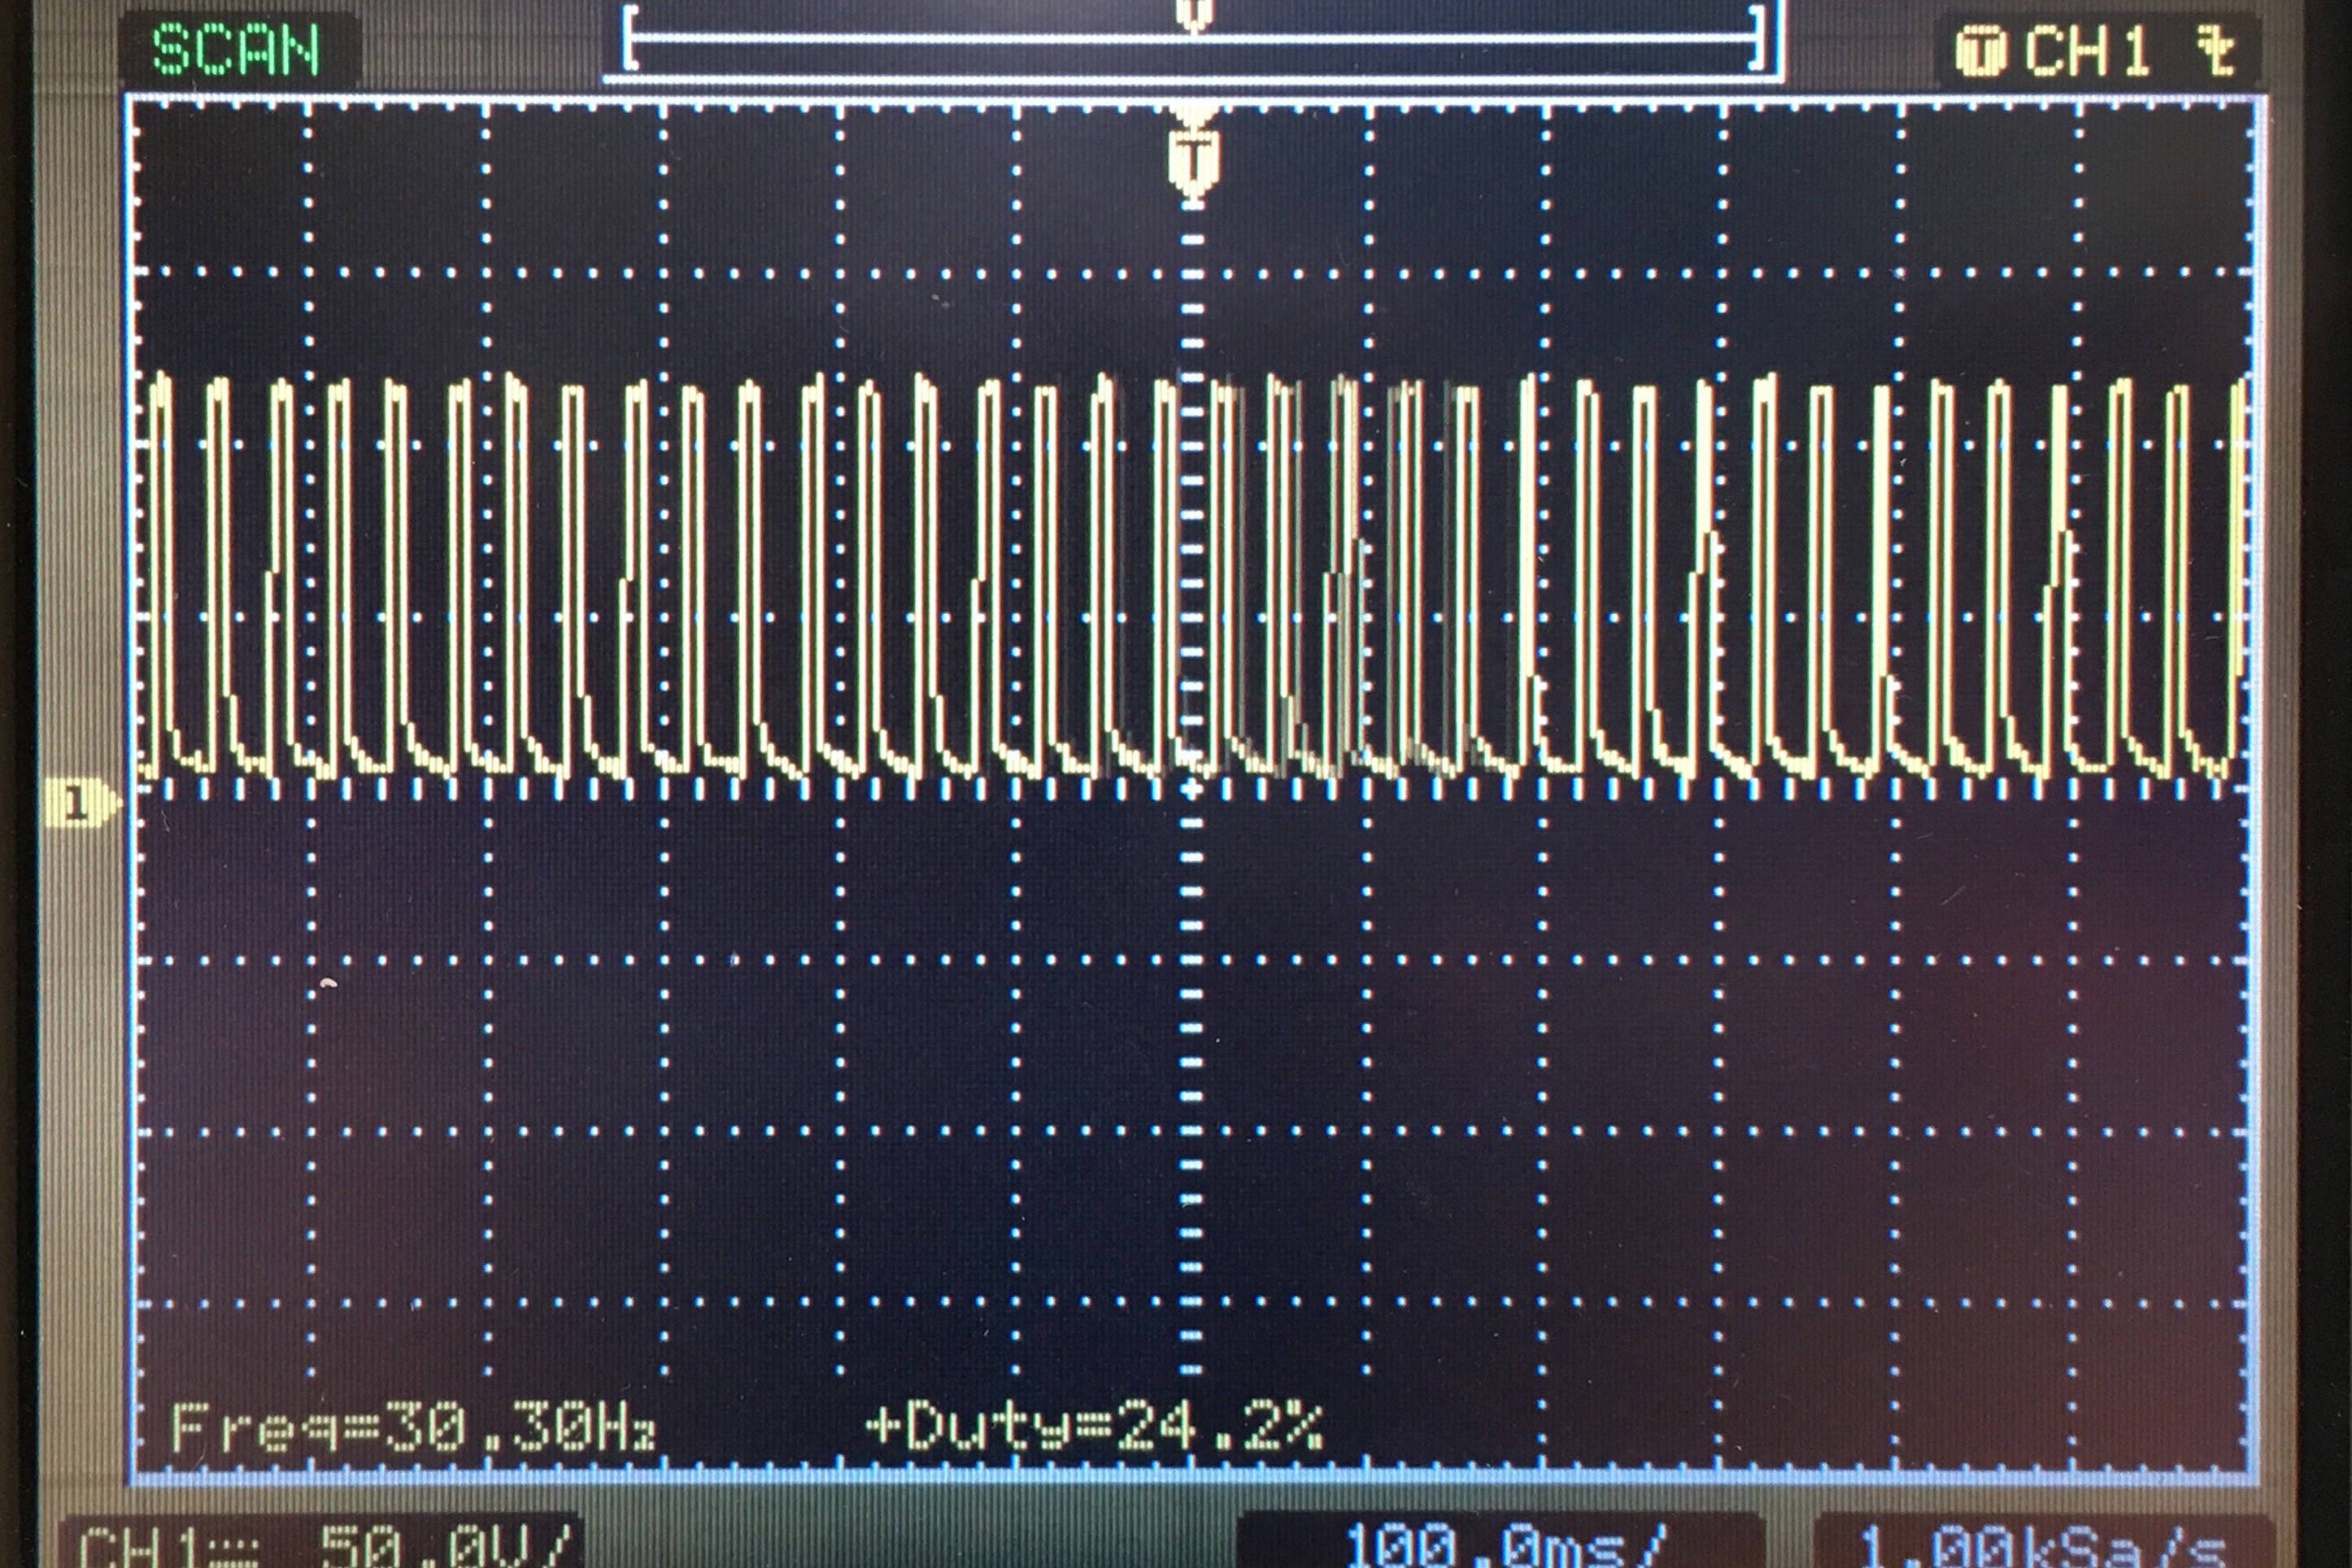
The Primary Waveform in the lamprey settings consists of a burst of 3 pulses and a short gap every second. The low pulse frequency and short gap of the Primary Waveform allow lamprey to move out of the sediment, whereas the higher frequency and consistent delivery of electricity in the Second Waveform allows the user to capture the ammocoetes with a net.
The LR-24 and Apex backpack electrofishers are the optimal pieces of scientific equipment for capturing larval lamprey. Watch the videos and follow the steps to set up and save the settings now so that you can easily recall these optimal settings in the field.
How To Set Up The LR-24 Backpack Electrofisher
Turn on Dual Channel Mode
- Press MENU.
- Press UP ARROW until
Enable Dual Channel?option is on screen. Press ENTER.
Primary Channel Setup
- Press PULSE TYPE.
- Press UP ARROW until
Primary Pulse Type: Burst of Pulsesoption is on screen. Press ENTER. - Press VOLTS.
- Press ARROWS until you reach desired voltage depending on environmental conditions. 125 Volts is common starting point. Press ENTER.
- Press FREQ.
- Press DOWN ARROW until you reach 1 Hz. Press ENTER.
- Press DUTY CYCLE.
- Press ARROWS until
Primary Pulses/Burst= 3. Press ENTER. - Press ARROWS until
Primary Burst Frequency= 4 Hz. Press ENTER. - Press ARROWS until
Burst Duty Cycle= 25%. Press ENTER.
- Press ARROWS until
Secondary Channel Setup
- Press UP ARROW until
Secondary Waveformis displayed. - Press PULSE TYPE.
- Press UP ARROW until
Secondary Pulse Type: Standard Pulseoption is on screen. Press ENTER. - Press VOLTS.
- Press ARROWS until you reach desired voltage depending on environmental conditions. 125 Volts is common starting point. Press ENTER.
- Press FREQ.
- Press ARROWS until you reach desired frequency. 30 Hz is common starting point. Press ENTER.
- Press DUTY CYCLE.
- Press ARROWS until you reach the desired Duty Cycle. 25% is a common starting point. Press ENTER.
Store the Dual Channel Settings
- Press STORE SETUP.
- Press ARROWS to choose the desired storage location. Press ENTER.
Recall the Dual Channel Settings
- Press RECALL SETUP.
- Press ARROWS to find the stored settings. Press ENTER.
How To Set Up The Apex Backpack Electrofisher
Turn on Dual Channel Mode
- Press MENU.
- Activate Dual Channels. Press BACK.
Primary Channel Setup
- Press WAVEFORM.
- Activate “Burst” waveform. Press BACK.
- Press OUTER/INNER.
- Press ARROWS to reach 1 Hz Outer.
- Press SELECT.
- Press ARROWS to reach 4 Hz Inner. Press BACK.
- Press DUTY/PULSES.
- Press ARROWS to reach 25% Duty.
- Press SELECT.
- Press ARROWS to reach 3x Pulses. Press BACK.
- Press VOLTAGE.
- Press ARROWS until you reach desired voltage depending on environmental conditions. 125 Volts is common starting point. Press BACK.
Secondary Channel Setup
- Press WAVEFORM.
- Press EDIT SECONDARY.
- Press WAVEFORM.
- Activate “Pulse” waveform. Press BACK.
- Press VOLTAGE.
- Press ARROWS until you reach desired voltage depending on environmental conditions. 125 Volts is common starting point. Press BACK.
- Press DUTY CYCLE.
- Press ARROWS until you reach the desired Duty Cycle. 25% is a common starting point. Press BACK.
- Press FREQUENCY.
- Press ARROWS until you reach desired frequency 30 Hz is common starting point. Press BACK.
Store the Dual Channel Settings
- Press WAVEFORM.
- Press FAVORITES.
- Press +. Press BACK.
Recall the Dual Channel Settings
- Press WAVEFORM.
- Press FAVORITES.
- Find and activate Dual Channel settings. Press BACK.
As always, give us a call (360) 573-0202 or write us at .(JavaScript must be enabled to view this email address) if you have any questions.
This one page attachment to Thompson et al. (2010) is an excellent source of information for designing a field study using the Dual Channel Lamprey Settings. Electrofishing Recommendations for Sampling Larval Pacific Lampreys
References
Dunham, J. B., Chelgren, N. D., Heck, M. P., and Clark, S. M. 2013. Comparison of Electrofishing Techniques to Detect Larval Lampreys in Wadeable Streams in the Pacific Northwest. North American Journal of Fisheries Management, 33: 1149–1155. doi:10.1080/02755947.2013.826758
Thompson, K., Brostrom, J. K., Wang Luzier, C. 2010. Best Management Practices to Minimize Adverse Effects to Pacific Lamprey (Entosphenus tridentatus). USDA Forest Service, USDI Fish and Wildlife Service, USDI Bureau of Land Management. 25 pp. (https://semspub.epa.gov/work/10/100016741.pdf)